
Troubleshooting a fountain that has stopped spraying water is a basic skill that every fountain owner and property manager should master. Bottom line: If a fountain suddenly stops spraying water, in 80% or more of these cases, you can identify the cause yourself in five steps—and at least half of these issues can be resolved on the spot without contacting a maintenance technician. Blindly calling for service often results in hearing only that ”the circuit breaker tripped” or ”the water level is too low”—issues you can easily handle yourself first. This article will guide you step by step, following a priority-based troubleshooting sequence, to identify the true cause of why your fountain has stopped spraying water.
Troubleshooting Guide for a Fountain That Isn't Spraying Water: Determine the Type of Problem Before You Begin
Different symptoms of a fountain not spraying water correspond to different causes and troubleshooting steps. Before you begin troubleshooting, observe the fountain for 30 seconds to determine which situation applies:
| Symptoms of the Malfunction | The most likely cause | Priority Areas for Investigation |
|---|---|---|
| There is absolutely no movement; the water pump is silent. | Power Outages, Circuit Breaker Trips, Control System Failures | Step 1: Circuit Inspection |
| The pump is running, but the water pressure is very low or nonexistent. | Clogged nozzles, low water level, clogged inlet pipe | Step 2: Checking the Water Level and Water Inlet |
| Some nozzles aren't dispensing water, while the others are working normally. | A single nozzle is clogged or the corresponding solenoid valve is malfunctioning | Step 4: Nozzle Inspection |
| The height of the water column has dropped significantly but has not stopped completely. | Declining pump performance, localized pipe blockages, low water level | Steps 2 and 3 |
| Does not run when scheduled to start | Control program or timer malfunction | Step 5: Control System Inspection |
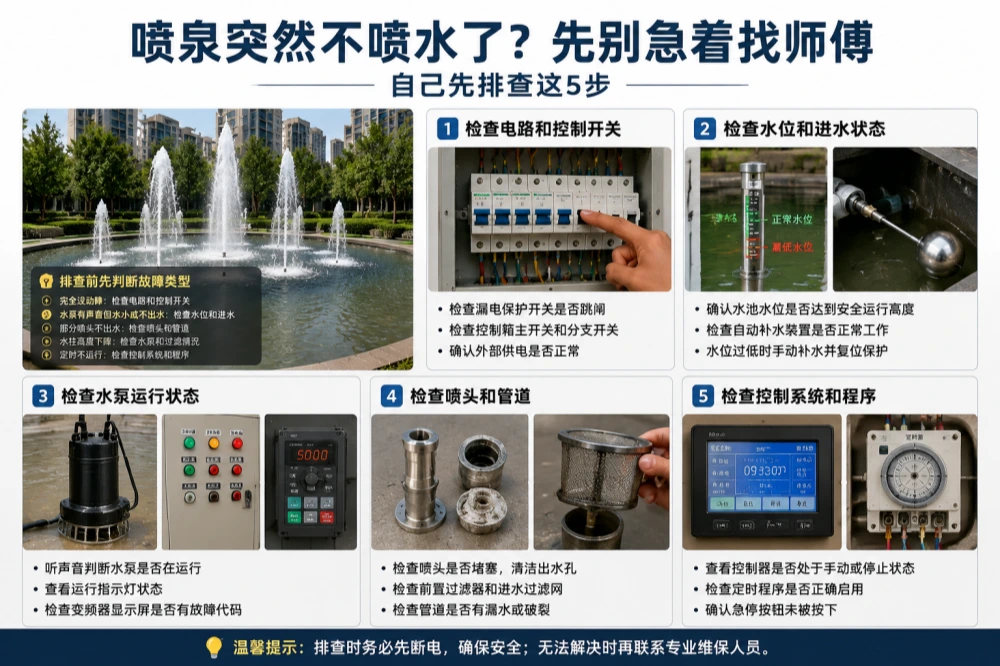
Once you’ve identified the problem, follow these five steps in order—don’t skip any steps. Many people skip the first two steps and go straight to disassembling the printhead, only to find that it was just a tripped circuit breaker, wasting their time.
Troubleshooting Steps When a Fountain Isn't Spraying Water: Step 1: Check the Electrical Circuit and Control Switch
This is the most easily overlooked troubleshooting step, yet it has the highest success rate. If a fountain suddenly stops working completely, the first thing to check is always the electrical circuit, not the equipment itself.
Check to see if the residual current device (RCD/GFCI) has tripped
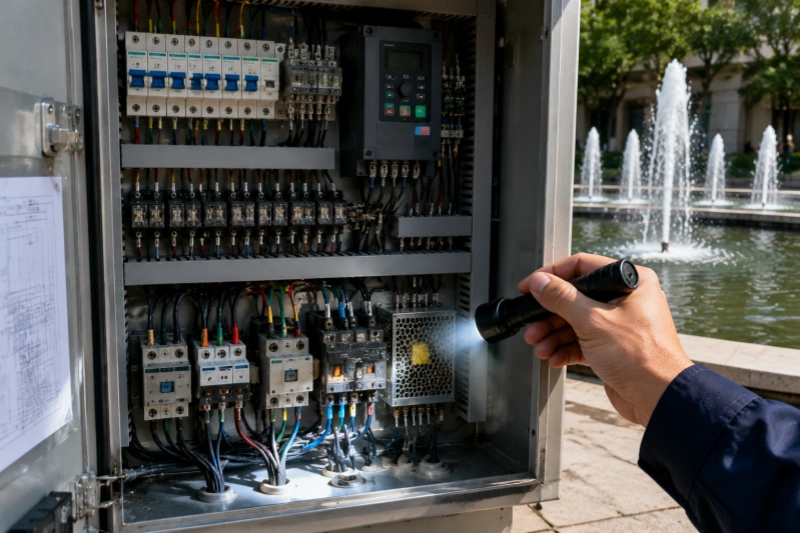
Locate the fountain’s electrical panel (usually found in a utility room, landscape control box, or nearby electrical cabinet) and check the status of the ground-fault circuit interrupter (GFCI). If the GFCI has tripped, the switch handle will be in the middle position (neither ”On” nor ”Off”); on some models, a red test button will pop out.
If you confirm that the circuit breaker has tripped, do not immediately reset it. A tripped circuit breaker indicates that the system has detected an abnormal leakage current; if you force a reset before the fault is resolved, the circuit breaker will trip again immediately and may even damage the equipment. Correct procedure: First, turn off the branch circuit breakers for all water pumps, then turn on the main residual current device (RCD) circuit breaker, and finally turn on each branch circuit breaker one by one to identify which circuit’s equipment triggered the RCD.
Check the main switch and each branch switch in the control panel
After confirming that the ground-fault circuit interrupter (GFCI) is functioning properly, check the status of each branch circuit breaker inside the control panel. If the circuit breaker corresponding to a single pump trips, only that pump will stop; the other pumps will continue to operate normally—this differs from the behavior when the main GFCI trips (causing all pumps to stop), so be sure to distinguish between the two.
Check to see if the external power supply is functioning properly.
Use a cell phone charger or other electrical device to test whether power is being supplied normally to the outlet near the fountain control box. If there is a problem with the external power supply itself (such as a power outage or a line failure), the equipment in the fountain control box will not respond. In this case, you should contact the property management or the power company, not the fountain maintenance team.
Step 2 of the Self-Check Procedure for a Fountain That Isn’t Spraying Water: Check the Water Level and Water Inlet Status
Once the circuit has been confirmed to be functioning normally, the next item to check is the water level. This is the second most common cause of malfunctions, second only to circuit breakers tripping, especially during the summer when high temperatures lead to high evaporation rates or when there are issues with the makeup water system.
Verify whether the water level in the tank has reached the safe operating level.
Visually check the water level in the tank. Most fountain systems are equipped with a water level protection device: when the water level falls below the preset minimum safe level, the PLC control system automatically shuts down the pump to prevent it from running dry and burning out—this is a normal safety feature, not a malfunction.
For a submersible pump to operate normally, the top of the pump housing must be submerged in water by at least 0.3–0.5 meters. If the water level is too low, the control system will prevent the pump from starting even if it is powered on. To check: Use a long pole or tape measure to measure the current water level in the tank, and compare it to the position of the pump housing to determine whether the minimum water level requirement is met.
Check to see if the automatic water refill system is working properly
Fountains are typically equipped with float valves or solenoid-operated makeup valves that automatically replenish water when the water level drops. A malfunctioning makeup water system is a common cause of a continuously dropping water level: the float in the float valve may be stuck in the closed position, or the supply valve on the makeup water line may have been accidentally shut off. Check whether water is flowing into the makeup water line and whether the float valve opens normally when the water level is low.
Temporary Solution: After confirming that the shutdown was caused by a low water level, manually replenish the water to the normal level, then reset the water level protection in the control system and restart the pump. At the same time, arrange for maintenance of the water replenishment system.
Step 3 of the Troubleshooting Guide for a Fountain That Isn't Spraying Water: Check the Pump's Operating Status
Since the circuit and water level are both normal, the next step is to inspect the water pump directly. Without disassembling the water pump, you can assess its condition using the following methods:
Determining Whether a Water Pump Is Running by Its Sound
Hold your hand or ear close to the water’s surface (be careful—do not put your hand in the water while the pump is energized) to feel for any vibrations caused by water flow and listen for the sound of the pump running. A submersible pump operating normally will produce slight vibrations and a humming sound, as well as noticeable water movement. If there is absolutely no sound or vibration, it means the pump has not started or has stopped working.
Check the pump operation indicator light on the control panel
Professional fountain control systems typically feature operational indicator lights for each pump on the control panel (green = running, red = fault, off = stopped). If the indicator light shows ”Running” but the pump is silent, this usually indicates a fault with the pump itself (e.g., a seized impeller or a burned-out winding); if the indicator light shows ”Fault,” you will need to further review the control system’s alarm logs.
Check the Variable Frequency Drive (VFD) Display
For fountain systems equipped with variable-frequency drives (VFDs), the VFD display shows real-time operating status and error codes. Meanings of common error codes:
| Common Types of Trouble Codes | Meaning | Approach |
|---|---|---|
| Overload (OL / OC) | The motor current exceeds the rated value | Check for a jammed impeller or a clogged pipe; reset the system and restart it. |
| Over-Temperature (OH / OT) | Insufficient Heat Dissipation in the Variable Frequency Drive | Check the cooling fan for dust buildup; clean it and then reinstall it. |
| Undervoltage (UV / LV) | Insufficient Input Voltage | Check whether the supply voltage is normal (standard: 380V ±10%) |
| Communication Error (CE / Err) | Communication with the control system has been interrupted | Check the connections of the control signal wires and restart the control system. |
Record the fault codes and refer to the inverter manual (or notify maintenance personnel) to quickly identify the type of fault and avoid disassembling the unit for inspection without a clear diagnosis.
Step 4 of the Self-Check Procedure for a Fountain That Isn't Spraying Water: Check the Nozzles and Pipes
If the pump is operating normally but the water output has decreased significantly, or if some nozzles are not producing water, the problem is usually with the nozzles or the piping. This step must be performed with the fountain shut down and the power turned off.
Check to see if the nozzles are clogged
Clogged showerheads are the most common cause of reduced water flow, especially when water quality is poor or the showerhead hasn’t been cleaned for a long time. Remove the showerhead manually (most showerheads can be unscrewed directly) and check the inside of the showerhead and the water outlets for scale, debris, or foreign objects that may be causing a blockage.
Cleaning Instructions: Soak the spray head in a mixture of white vinegar and water (1:1 ratio) for 30–60 minutes. Once the mineral deposits have dissolved, use a soft-bristled brush to clean the water outlets, rinse thoroughly, and reinstall. If the water outlets are clogged with solid debris (such as leaf fragments or sand), gently clear them with a thin piece of wire or a toothpick. Do not scrape the inside of the spray head with sharp tools (as this will damage the precise water spray angle).
Check the pre-filter and the inlet water filter screen
A filter screen is typically installed at the pump’s inlet to prevent debris from entering the pump. If the filter screen is not cleaned regularly, a large amount of debris will accumulate, increasing inlet resistance and significantly reducing the pump’s flow rate. This results in a decrease in the water column height rather than a complete stoppage of flow. Remove the intake strainer, rinse it thoroughly with clean water, and reinstall it. This is the most basic—and most commonly overlooked—task in quarterly maintenance.
Check the pipes for leaks or breaks
A pipe rupture can cause insufficient water pressure from the pump, resulting in a simultaneous decrease in water flow from all sprinkler heads—rather than a problem with a single sprinkler head. Inspection method: While the pump is running, observe the pool along the route of the main pipe for any abnormal water turbulence (a rupture will produce noticeable bubbles or a column of water), and check the pipe joints in the equipment room for signs of leakage.
Step 5 of the Self-Check Procedure for a Fountain That Isn’t Spraying Water: Check the Control System and Program
If the first four steps have all been confirmed to be normal but the fountain still isn’t operating as expected, the problem is usually with the control system. This step is relatively complex, and there are limited situations where you can handle it on your own, but you can perform the following checks yourself:
Verify that the control system is in the correct operating mode.
Fountain control systems typically have several operating modes: automatic mode (programmed, timed operation), manual mode (manual start/stop control), and shutdown mode (all equipment stopped). Check the control panel or touchscreen to confirm that the current mode is correct. A common error is forgetting to switch the system back from ”Manual Shutdown” to ”Automatic Operation” after maintenance.
Check the time settings for the scheduled task
If the fountain is not operating during a specific time period, check whether the time settings on the timer controller are correct. Daylight saving time adjustments, clock resets following a power outage, and accidental manual changes can all cause time discrepancies in the timer program, resulting in the fountain starting outside of the expected time period. Verify that the current time on the controller matches the actual time.
Try restarting the control system
Occasional program anomalies in a PLC control system can be resolved by powering down and restarting the system. Disconnect the control system’s main power supply for 30 seconds, then reconnect it to allow the system to complete its self-test and initialization procedures. If the system returns to normal after the restart, this indicates an occasional program anomaly; if the fault persists after the restart, contact a professional to inspect the control program or hardware.
Still having trouble after going through the 5 steps? In these 3 situations, you must contact a professional.
In the following three situations, we do not recommend continuing to handle the issue on your own; you should contact a qualified fountain maintenance technician:
- Recurring tripping of the ground fault circuit interrupter:If the circuit breaker trips again shortly after being closed, this indicates a persistent ground fault in the system. Electrical ground faults underwater pose a safety risk; a licensed electrician must inspect and locate the source of the ground fault. Do not force the circuit breaker to remain closed and continue operation.
- The water pump is making unusual noises (metallic grinding sounds, cracking sounds):A metallic grinding noise indicates that the impeller is coming into contact with the pump housing (due to impeller deformation or foreign objects entering the pump); a cracking sound may be caused by cavitation (vaporization of water due to insufficient inlet pressure). Continuing to operate the pump will accelerate damage; shut it down immediately for inspection and repair.
- The control system displays an error alarm that cannot be reset:A fault alarm that cannot be reset indicates a hardware malfunction (such as a damaged sensor, a faulty control module, or a damaged drive). This requires diagnosis by a professional using specialized tools; non-professionals are advised not to disassemble the control equipment on their own.
Frequently Asked Questions (FAQ)
The fountain isn't spraying water, and after completing the 5-step self-check, I still haven't found the cause. What's the most likely problem?
If, after completing the 5-step troubleshooting process, the electrical circuit is functioning normally, the water level is normal, the pump is not making any unusual noises, the nozzles are not clogged, and the control system is set to the correct mode, but the fountain still does not operate, the two most likely scenarios are: First, an internal short circuit or open circuit in the pump windings (the pump appears to be powered but does not actually rotate; this requires measuring the pump’s operating current with a clamp meter to confirm); Second, a logical error in the PLC control program, causing the system to believe that a certain safety condition has not been met and thus refusing to start the equipment (requires connecting a programming computer to read the PLC status). Both of these situations require handling by a professional.
The fountain pump is running, but the water stream is getting weaker and weaker—it hasn't stopped completely. What could be the cause?
If the water flow gradually decreases but does not stop completely, it is usually due to one of the following reasons: the inlet filter screen is gradually becoming clogged with debris (increasing water resistance); wear on the pump impeller is causing a decrease in efficiency (common in pumps that have been in use for more than 3 years); the water level in the tank is slowly and continuously dropping (due to evaporation or an insufficient water replenishment system); a slight leak at a pipe joint (resulting in a gradual loss of water pressure). These issues usually develop gradually rather than occurring suddenly; it is recommended to consider the date of the last maintenance to determine the most likely cause.
The ground fault circuit interrupter (GFCI) for the fountain has tripped. How can I determine which device is causing the ground fault?
Steps to identify the device causing a ground fault: First, turn off all branch circuit breakers, then close the main ground fault circuit interrupter (GFCI) (it should no longer trip at this point); then close each branch circuit breaker one by one, waiting 10–15 seconds after closing each one to observe whether it triggers a trip; the branch that causes the circuit breaker to trip is the source of the ground fault. Once the specific branch has been identified, inspect the pumps, lighting fixtures, or control devices on that branch, paying particular attention to the integrity of the seals on submersible equipment (such as the sealing rings on lighting fixtures and the points where pump cables enter the water). After confirming and isolating the device causing the leakage, allow other equipment to operate normally, while keeping the device causing the leakage de-energized until it is repaired.
What should I do if the fountain doesn't produce water when I restart it in the spring after it has been shut down for the winter?
There are three most common reasons why water does not flow during a spring restart: First, if the system was not completely drained before being shut down for the winter, residual water in the pipes may freeze, causing the pipes or joints to crack; you should check for pipe leaks. Second, the pump’s seal ring may have hardened due to low winter temperatures, and when power is restored, the seal ring may not regain its normal elasticity, allowing water to leak into the motor; Third, some parameters in the control program are reset after a power outage, so you’ll need to reconfirm the program settings and the clock time. Before starting up in the spring, it is recommended to start the pumps one by one in manual mode. Observe them for 5–10 minutes to confirm that all equipment is operating normally before switching to automatic mode.
I bought a water pump and want to replace it. What should I keep in mind?
Before replacing the pump yourself, you need to verify three parameters: head (the height to which the pump can lift water; it must be 1.5–2 times higher than the sprinkler head installation height), flow rate (water output per hour; it must match the original pipe diameter and number of sprinkler heads), and power and voltage (ensure compatibility with the original control circuit). Also, verify that the pump’s connection size matches the existing piping. If the original pump is equipped with a variable frequency drive (VFD), the new pump must be compatible with the VFD’s control interface. Interface standards may vary between different brands, so it is recommended to consult the manufacturer to confirm compatibility before purchasing. It is recommended that underwater electrical connections be handled by a licensed electrician to ensure waterproofing meets the IP68 standard.
Huiqi Fountains has been deeply involved in the fountain industry for 19 years. Upon delivery of every project, we provide a complete inventory list of equipment, as-built drawings, maintenance manuals, and backup copies of control programs to enable owners and property management teams to perform routine inspections and basic maintenance on their own. If the issue persists after following the 5-step self-diagnosis process, please feel free to contact our engineering team at 18818738142.
 Chinese
  English